|
This option is located in the Design menu under Page Setup section as shown in the screenshot below. How to Change Slide Orientation in PowerPoint 2011 for Mac. If you are using Mac instead of Windows, then you can also change the slide orientation in Microsoft PowerPoint 2011. In this case, the Page Setup option is located under Themes menu. • Click the Layout tab. • Click the dialog box launcher in the lower-right corner of the Page Setup group. The Page Setup dialog box appears, Margins tab forward. • Type the margin offsets in the Top, Bottom, Left, and Right boxes. Or you can use the spinner gizmo to set the values. Use the Preview to check the margins as they relate to page size.  
• Ensure that Whole Document is chosen from the Apply To menu button. You can reset margins for only a section or selected text if you instead choose those options from the menu. • Click the OK button to confirm your new settings and close the Page Setup dialog box. The Gutter settings help set margins when you need extra space on one edge of the page for binding. For example, if you plan on using a 3-hole punch on the left side of a page, choose Left from the Gutter Position menu. Then increase the Gutter margin to accommodate for the three holes in the page without affecting the left margin setting. • The keyboard shortcut to summon the Page Setup dialog box is Alt+P, S, P. • The Page Setup dialog box sports three tabs: Margins, for setting margins, Paper, for selecting the page size, and Layout, for dealing with other page-formatting issues. - fixed crashes on some radio stations - fixed Long Press/3D Touch in Big Player view - removed Long Press/3D Touch in Equalizer view - fixed wrong artworks in Queue when Radio stations are mixed with tracks - fix crash when trying to download Loop track in 'Tracks' Library view mode - added 3D Touch option in artist view header - fixed problem with disappearing artworks for local files. - Added Time Stretch/Tempo control! Search Global dropdown menu • • • Reach out to an expert who can help you. • Find books, audio and video, music scores, maps and more. • Use the best resources we have, picked by librarians. • There's a wealth of information to be found through our database subscriptions. • We're committed to partnering with you to enhance and showcase your research. • Print and digital collections serve as extensions of our teaching and research facilities. • • Quick Links • • • • • • • • • Find books, audio and video, music scores, maps and more in the catalog. • Learn how to borrow materials at Dartmouth and from other libraries via BorrowDirect or DartDoc. • We've got everything from chargers to a professional portable recording studio. • How to access resources, on and off-campus. • Discover an extensive range of movies, television series, documentaries, educational programs, audio and more. • Students, staff, and faculty can access most of our electronic resources off-campus. • • Quick Links • • • • • • • Book a meeting room for a group or sign up to use a private study room. • Our hours, holiday closings, street addresses and contact information. • Our main library houses the humanities and social sciences collections. • The Dana and Matthews-Fuller libraries support the disciplines of health and life sciences. • Houses thousands of sheet maps, mapping software, atlases, globes & more. • Offers support for the Tuck School of Business & Thayer School of Engineering. • Provides facilities & collections for researching, viewing & producing media. • Primary resource for the physical sciences including chemistry, mathematics, physics & more. • Includes scores, sound and video recordings, reference materials, journals and digital resources. • Includes rare books, manuscripts & more. • Supports the departments of Art History, Studio Art, as well as the Hood Museum of Art. • • About Us • • • • • • • • • • • • A complete list of services and tools that support your research. • We're committed to partnering with you to enhance and showcase your research. • We provide consultation focusing on opportunities in digital publishing and scholarship. • We have a subject expert for your major or course who wants to help! • Working together with faculty, we can help design and implement effective research experiences for students. • We offer a variety of events to assist you in developing skills ranging from research to programming. • • Quick Links • • • • • • Login • • • • •. One way to avoid computer compatibility problems is to make a PDF of your poster and print the PDF rather than the PowerPoint file. This may also make the file significantly smaller in terms of disk space. You will, however, need to change some settings in your “Page Setup.” Here are instructions for making a PDF from PowerPoint on a Mac.
0 Комментарии

It didn’t work for me and I don’t understand why. I copied the file and, when I double-clicked on it, it opened the PowerPoint presentation. So, instead, I opened the file with the program Unarchiver. That gave me a folder with the name of the pptx document and five files inside — “DocumentSummaryInformation,” “PowerPoint Document,” “SummaryInformation,” “Current User” and “Pictures.” None of the files had extensions and, when double-clicked, they opened up in TextEdit showing what looked like code. I’m trying to get a sound out of a PowerPoint presentation. I’m on a MacBook Pro with an i7 processor and 16 GB of RAM, running OS X 10.11.6 (El Capitan) and PowerPoint 2008. Who is behind Guide2Office? We’ll Give You Proof! Source: Company PowerPoint Template For Mac – Whether you’re presenting your company’s budget or new sales strategy, the Company Presentation Template can help you deliver your content clearly. It’s built for business professionals by design professionals. Source: Business PowerPoint Template For Mac – As. Microsoft PowerPoint is the best presentation software for meetings, industry talks and business proposals. Create simple slideshows or complex multimedia displays for in-person or online presentations. 
My name is Stephanie Krishnan and I'm passionate about the way that open source software and its community can help small businesses and individuals with their productivity and lives. One of the biggest arguments I get from business owners, however, is lack of support options. I decided to put together my own support blog to help people be productive at various levels with various Office software, including OpenOffice.org, LibreOffice, NeoOffice, MS Office and Apple products! Do not click any of those buttons, no matter how tempting that ‘Eject’ button might look! It’s now safe to press the Ignore button on the window you saw in Step 5. You’ll also likely get a popup from MacOS saying that the USB stick can’t be read by the computer. Step 6: Finishing up It’s now time to eject the disk. We need to do this manually, to do so, enter the following command: diskutil eject /dev/diskX Replacing the X with the number you used earlier in this guide. Create bootable usb on mac for linux. 
Capture the menu by following the steps to capture the entire screen, capture a window (the menu is treated like a window), or capture a selected portion of the screen. Markup, share, and save After you take a screenshot, a thumbnail of the screenshot appears briefly in the lower-right corner of your screen. Windows tablet owners can take a screenshot by pressing both the Windows button and Volume-down key at the same time. You will find the image in the Screenshots folder in the Pictures library. Sarah Tew/CNET Taking a screenshot is nothing new. The feature has been available across numerous platforms and devices for well over a decade. How to actually take a screenshot, however, remains one of the most frequently asked questions. Whether you're running Windows XP or, these are all the ways you can take a screenshot: Take a screenshot in Windows XP There are only two ways to take a screenshot in Windows XP. A tap of the Print Screen button will copy an image of your entire screen. This image must then be pasted (this can be done by pressing the Control and V keys at the same time) in a program like Paint, at which point you will also be able to save the image. More Windows 10 tips • • • The other option is to capture a specific window. You can do this by pressing the Alt and Print Screen keys at the same time. You will, once again, have to open Paint, paste the image, and Save it. On a majority of keyboards, the Print Screen key can be found in the upper-right corner. It will likely be labeled as either PrtScn or PrtSc. Take a screenshot in Windows Vista and Windows 7 In addition to the two Print Screen methods detailed above, Windows Vista and Windows 7 users can also utilize the Snipping Tool. This feature is available on all versions of Windows, with the exception of Starter and Basic editions, and Windows XP. To open the program, click the Start button, select All Programs, followed by Accessories, and select the Snipping tool from the list. 
The Snipping tool lets you take a screenshot of a specific area of the screen (similar to the OS X command with the Command, Shift, and number 4 keys). Open the program, click New, select the area of the screen you would like to capture, and then click Save. Take a screenshot in Windows 10 and Windows 8 Users with a or Windows 8 machine have the added ability to take screenshots that automatically save to a special folder. Pressing both the Windows and Print Screen key at the same time will capture the entire screen. This image will automatically be saved to a Screenshot folder inside of the Pictures library. The Print Screen methods from Windows XP and the Snipping tool can also be utilized in Windows 10 and Windows 8. My passport ultra vs for mac. You can search for the Snipping Tool on the Start screen in Windows 8 or in the search field next to the Start button in Windows 10. Take a screenshot on a Windows tablet or smartphone. 
By After registering for a Spotify account, you get directed to a page that should automatically launch the installation file for your Mac. To download the software, follow these steps: • If the installation file doesn’t automatically launch, go to and click Download Now. Whether the file launches automatically or you manually download it, your browser prompts you to save the Spotify.dmg file. • In the Firefox browser, click Save File to confirm the save. You may get a slightly different message, depending on the browser you use. The file shortly appears in your Downloads folder. • Double-click the file to open it. A window appears, prompting you to drag the Spotify icon to your Applications folder. • Click the icon in this window and drag it to the Applications folder shown next to it. A dialog box may appear, saying that Spotify can’t be moved because Applications can’t be modified. • If the warning dialog box appears, click Authenticate, enter the administrator’s username and password in the text boxes provided, and then click Log In to approve the process and install the program. A dialog box may appear, asking whether Spotify can access your keychain. Spotify is a digital music service that gives you access to millions of songs. The Mac version of TunesKit Spotify Music Converter for Mac is the ultimate solution for Spotify subscribers who want to fully control the songs. With this powerful Spotify DRM removal app, you can easily download any Spotify song and convert the track to DRM-free formats for any device and player. • (Recommended) Click Allow to give Spotify access to your keychain. Your keychain can save you from having to enter the administrator password every time you open the program. But you may need to reenter it when the software gets updated every now and again. Spotify is now stored in your Applications folder. You can create a link to it in your Dock by clicking and dragging the icon. Share: 5 Free Spotify downloader for Mac/Windows Spotify is a popular music streaming service which gives everyone easy access to over 30 million songs on multiple devices like Mac, Windows, iPhone, iPad, iPod Touch, Android phones and tablets. It provides free and premium subscription. With premium subscription ($9.99 pre month or $14.99 per month for family), you can enjoy high quality streaming (320kbit/s) without ads interruption and download playlists for offline listening. Free subscribers can't download Spotify music. Ok, so my Dad bought my macbook pro for me and annoyingly enough he decided to set it up before giving it to me and used his appleID in the process. I'll forward it to my users and hopefully can report on the results. Now I would like to update iMovie/iPhoto etc. They can only listen to the Spotify music online with network connection. You may wonder is there any tool that allows everyone to download Spotify music, even without premium account? Well, what you need is a spotify downloader. Spotify Downloader is an app that allows you to download any Spotify songs, albums or playlists from any Spotify account, whether premium or free. The downloaded Spotify songs are saved in plain formats, such as mp3, which means you can enjoy the songs anywhere outside Spotify app, such as on your iTunes, Google Play Music, iPod or Sandisk mp3 players. Here we will introduce you 5 free Spotify downloader tools that you can use to download any Spotify songs, albums or playlists on Mac or Windows for offline listening. Spotiload (former Spotify Vk Downloader) Spotiload (former Spotify Vk Downloader) is a free Google Chrome extension which allows users to download Spotify songs. It finds and downloads Spotify tracks from vk.com with matching name from any Spotify playlist. Com is a socila network where users can upload own mp3 files to website and name them as they like. Log in to vk.com and go to Spotify page, now you can use Spotiload tool button to select and download tracks you'd like to find on vk.com. Pros: Free Cons: Injects and replaces ads into multiple websites without warning. Requires a vk.com account. Only songs on the VK site can be downloaded. Doesn't work on songs that have multiple artists. Spotify & Deezer Music Downloader Spotify & Deezer Music Downloader is also a Google Chrome extension for you to save Spotify & Deezer Tracks from Spotify and Deezer WebPlayer. You can download music from the Spotify Web player directly, extension adds a download button to web player interface. Watching Netflix offline was a dream until fairly recently. In the past, watching Netflix offline wasn’t possible because there was no way to download Netflix movies or TV shows. Use this article to learn about Netflix features on your Mac computer, and how to set up and sign out of your account. The free movie app for SnagFilms is available on most major devices, is simple to use, and lets you share films over social media. Watch Free TV Shows and High Definition Movies at Free Movies Cinema. How to Use Popcornflix to Stream Movies and TV Shows for Free. 
But that’s all changed and now learning how to download Netflix movies and TV shows for offline viewing is easy with a quick how-to. We’ll cover how to watch Netflix offline by downloading your content ahead of time, as well as whether or not you can download Netflix on Mac or PC, what’s available on Netflix to download, and how to change the video quality for your Netflix downloads. Subscribers have been wanting to watch Netflix offline on their iPads or iPhones for years, and now Netflix has made it easy. Here's how to watch Netflix offline on iPhone and iPad. We all want to know how to download Netflix movies onto our iPads or iPhones, especially for long plane flights, where offline Netflix would be a godsend. Luckily, Netflix finally gave the people what they want. With a little planning ahead, you can download Netflix movies or TV shows and then watch them offline. When you download Netflix content, it’s saved offline to your iOS device, such as your iPad or iPhone. While Netflix has made it easy to download movies and TV shows to your iPad or iPhone, the same cannot be said for offline Netflix movies on Mac. This is largely due to the fact that there is no official Netflix app for Mac. I’ll cover my recommendations for watching Netflix offline on Mac below, but it’s not something I condone and is in violation of Netflix’s Terms & Conditions. But on your iPad or iPhone, you can download and watch all the Netflix movies and shows that can fit on your device. Related Video: Use 3D Touch to Continue Watching Netflix. Can You Watch Netflix on a Plane? In one word, yes! But make sure you plan ahead. When you’re packing for your trip, get on your iPhone or iPad and figure out what content you want to download for offline viewing. Use our tip below to do it. Then when you’re on the plane, the Netflix movies or TV shows you downloaded will be ready and waiting. When you’re done watching, be sure to delete the saved content, as it does take up space on your iOS device. Now, let’s jump into how download and watch Netflix offline. How to Download & Watch Netflix Offline on iPad or iPhone • First, we need to update (or download) Netflix. To do this, open the App Store, tap Updates, and tap Update next to Netflix. Once your Netflix app has the latest update installed, open the app. • When you first open the app after updating Netflix, you’ll likely see the screenshot below informing you of the new offline watching feature. You can tap Find something to download or dismiss it. • However, the typical way you’ll access downloadable Netflix content is by tapping the Menu icon in the upper left corner that looks like three horizontal lines. • From the menu, tap Available for Download. • Find a show or movie you want to download for offline viewing. • Look for the download button. Tap the download button to download a full movie. You’ll need to download each individual episode of a series. Where to Find Your Netflix Downloads • Once your show or movie has downloaded, open the main Menu up again and tap My Downloads. Your list of downloads is easily accessible from here. Some popular titles available for download on Netflix include: • Orange is the New Black • Stranger Things • The Crown • The OA.And so much more. If you’re looking for something in particular, visit the Available for Download tab, found in the main menu on Netflix. Then tap the search icon, find the show or movie you’re looking for, and tap on. If you see a download icon, it’s available for offline viewing. If not, you’ll need the good ‘ol Wi-Fi connection to watch it. How to Delete Downloaded Netflix Content • Once you’re ready to remove a download from your offline viewing list, you can swipe left on the download and tap the X to delete it. • Or tap Edit in the upper right corner and tap the X next to each download you want to remove. How to Delete All Downloaded Netflix Content • In the Netflix app, open the main menu by tapping the three horizontal lines in the upper left corner. • Scroll down and tap App Settings. • Tap Delete All Downloads. • Confirm Delete. Why Did My Netflix Download Expire & What to Do About It Netflix movies and TV shows expire at different times. 
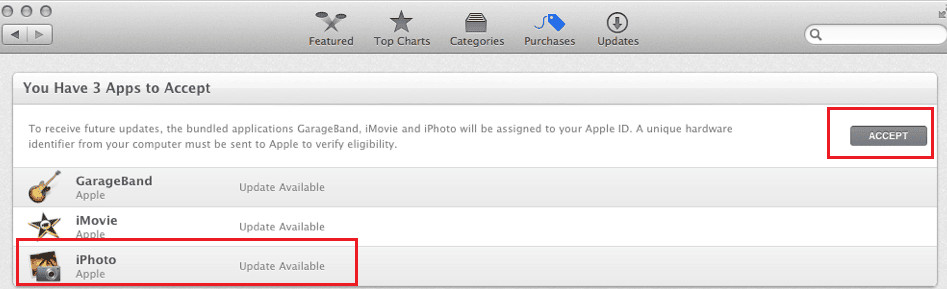
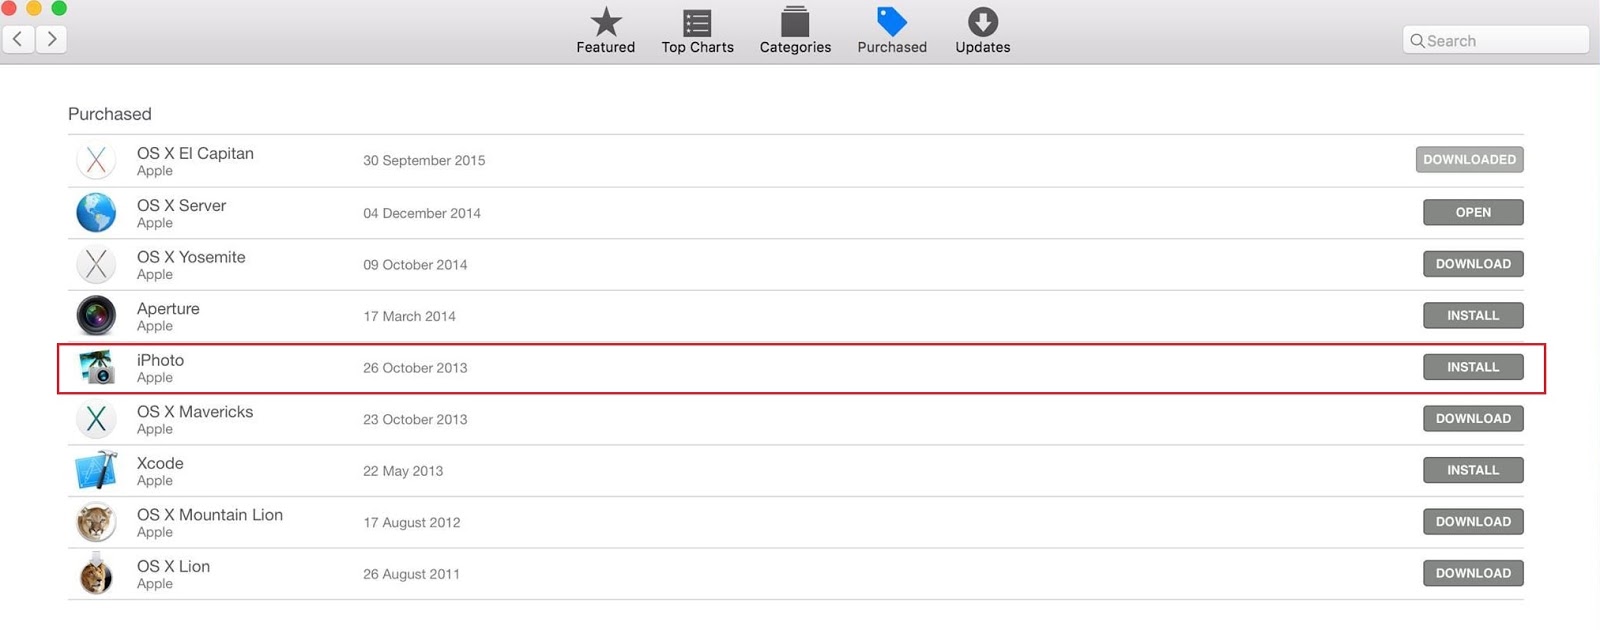
May 26th, 2015 by Lyle Smith WD My Passport Ultra and My Passport For Mac Now Available WD has announced a new, redesigned 7th generation My Passport Ultra portable hard drives and My Passport for Mac drives available in capacities up to 3TB and in four colors; Classic Black, Brilliant White, Wild Berry and Noble Blue. In addition, WD has introduced WD Grip Pack, a new optional soft band accessory, which encircles the drive to provide consumers with an easy way to personalize their My Passport drives. My Passport Ultra portable drives are available in capacities of 3TB, 2TB, 1TB and feature 256-bit AES hardware encryption (with no impact to write-speed or CPU activity) for a high-level security to protect user content with a password known only to them. Its USB 3.0 compatibility allows for data transfer rates of up to 5 gigabits per second as well as backward compatible with USB 2.0. The My Passport for Mac portable drives come in 3TB, 2TB, and 1TB capacities and also feature 256-bit AES hardware encryption with USB 3.0 connectivity. All models come with the company’s built-in and easy-to-use WD Backup software, which helps to ease frustration when setting up a backup plan to preserve data. The WD Grip Pack accessory for My Passport Ultra is designed to personalize the device with five different colors: smoke, slate, grape, sky and fuchsia. The WD Grip Pack also comes with a color-matched 18” flat USB 3.0 cable. Pricing and Availability My Passport Ultra and My Passport for Mac portable drives are now available on the WD store and at select retailers ranging from $79.99 up to $199.99 (the 3TB capacity will be available next month). Both the My Passport Ultra and My Passport for Mac are backed by a 3-year limited warranty. Update: Our review for the. Compare WD My Passport for Mac vs WD My Passport Ultra| B&H. WD 2TB My Passport Ultra USB 3.0 Type-C External Hard Drive for Mac (Silver). A fantastic storage companion for MacBook users. I’ve been a fan of Western Digital storage options for a very long time. A company I used to work for had to do daily backups and per project backups and we relied on Western Digital products to ensure that our data was secured. In all the time we used WD hard drives, I don’t think we ever had a drive fail. Now that I am working independently and I need storage solutions for my media backups, I immediately looked to Western Digital. I have a 2016 13-inch MacBook Pro, which only had USB-C ports on it so I was grateful to find that WD had a portable storage option for people in my situation — the My Passport Ultra USB-C edition. DETAILS The My Passport Ultra USB-C edition has the same compact design as classic My Passport drives from WD with the addition of a USB-C port. The case has been modified slightly from previous versions to include a metal cover. The drive is USB-C ready (as previously mentioned) and compatible with USB 3.0 (with the use of a provided adapter). The hard drive can act as an automatic backup drive and features password protection as an option. How to get ilife for free with new mac os install new apple id 2017. Purchases with your Apple ID are good for up to 10 devices and computers (total), so it looks like you can spread the app love from a new iPad or Mac around quite a bit. Now, go to iTunes on your old device (logged in with the same Apple ID account, mind you) and open the Purchased Apps screen: You'll see those new iLife and iWork apps that you hadn't purchased before listed up towards the top. We didn't try this out on Macs yet, but presumably the deal is the same: Open App Store, claim your software, then go to another Mac and see if you can download it on that computer, too. The hard drive can also be encrypted using 256-bit AES hardware encryption through WD Security. Thanks to WD’s built-in software, WD Discovery, the drive also features social media and cloud storage import. This utility software can also help to manage your hard drive with WD Drive Utilities. Out of the box, the drive is Windows 10 ready, but it can be formatted to work with Mac computers, too. The My Passport Ultra USB-C is available in three sizes — 1TB, 2TB, and 4TB. It’s very easy to use and has a 3-year limited warranty. There are two color options — Blue/Black and Silver. Why a flash drive? A bootable external or internal hard drive works well for desktop Macs but presents a cumbersome problem for notebook Macs. A flash drive is a simple, inexpensive, and portable emergency boot device that can handle OS X or the macOS. Heck, it can even have both operating systems installed, letting you use the emergency USB flash drive to boot any of the Mac's you may have. Even if you don’t use a notebook, you may want to have a bootable USB flash drive on hand. What You Will Need. After downloading the installer, connect the USB flash drive or other volume you're using for the bootable installer. Make sure that it has at least 12GB of available storage and is formatted as Mac OS Extended. Dec 19, 2018 - You can create a bootable OS X Yosemite installer on aa USB flash drive with a simple Terminal command that Apple includes within the. Apple uses its App Store to distribute its software, like new Mac operating systems. It’s convenient, but sometimes it can take a while for a download to finish. And if you have multiple Macs, it’s inefficient to download the new OS to each and every Mac. That’s why I like to make a bootable external drive for the sole purpose of installing the Mac operating system. How to get ilife for free with new mac os install new apple id card. When I need to tend to a bunch of Macs, it’s much faster to use a bootable drive instead of going to each Mac, launching the App Store, searching for the operating system, downloading it (after entering my Apple ID), and then running the installer. You can create a bootable USB flash drive with the macOS Sierra installer that’s now available. The installer software will take up nearly 5GB of storage space. Here’s how to create a bootable macOS Sierra installer drive. Macworld also has bootable-install-drive instructions for: • • • • • • Download the macOS Sierra installer Launch the App Store app, then look for macOS Sierra in the store. (.) Click on the Download button, and your Mac will download the installer to your Applications folder. If it automatically launches after download, quit the installer. Keep the installer in the Applications folder. If you’ve already upgraded your Mac to Sierra, the installer is removed from the Applications folder. You can download it again if you go to Purchased in the App Store. Look for macOS Sierra in the list of apps that you’ve bought, and click on the Download button. If it automatically launches after download, quit the installer. Get an external drive You can use a USB flash drive or a hard drive with room for the installer software. 
I’ve used different drives with success, including a VisionTek 120GB USB 3.0 Pocket Solid State Drive ($83 on ) and an old 8GB Iomega Micro Mini Hard Drive. Don’t worry if the drive isn’t formatted for the Mac. The drive will be reformatted automatically as part of the process. Change the name of your drive to Untitled; you need to do this for the steps below. The quick and easy way The process detailed below involves the Terminal. If your really don’t want to use Terminal, there are a couple of free apps you can use. If you want to create a bootable USB drive from an ISO file, the following utilities are recommended. These tools each work on Windows, Mac and Linux computers, respectively. Choose the tool based on what platform you intend to create the bootable drive on. I'm trying to create a bootable USB key with Linux (debian) and that can be booted on Macintel hardware. I have read that MAC's EFI can only boot GPT GUID formatted disks. I'm desperately trying to find a good tutorial which explains how to create such a key. I'm trying to create a bootable USB key with Linux (debian) and that can be booted on Macintel hardware. I have read that MAC's EFI can only boot GPT GUID formatted disks. I'm desperately trying to find a good tutorial which explains how to create such a key. Here what I have done so far: • create a GUID partition on te key using Linux GNU parted • create a HFS+ or ext3 partition on the key, with the boot flag on • install a Linux.iso with unetbootin While all steps were successfull and in some cases I could even boot on a PC, the step of booting on Macintel software failed (on a macbook). I need to precise that I holded the 'alt' key while booting the mac and the only visible bootable disk was the hard disk. PS: I have tried with rEFIt as well. In one case I had a 'Windows' icon but it then failed to boot with a message like 'no system found' Edit: This is a rather old question, I haven't tried for a while, maybe today it is just a matter of running dd to copy the iso, but it did not work 5 years ago. I'm going to try with a recent macbook and linux iso. From: It works! Can now boot Linux on an unmodified MacBook Pro (5,2) from a single USB stick (or external hard drive). I created a small 25MB partition as the first partition, formated it as Mac OS X Journaled and installed rEFIt to it, then followed that partition with a 100 MB boot partition, and then a root partition on a thumb drive (if using an external hard drive you could create swap as well, but I don’t do that on thumb drives so they don’t get worn out). Install linux normally (debootstrap is how I do it) onto the second and third partitions. Make sure Grub is installed to the MBR of the drive and points to the /boot partition as the second partition. Then take the USB drive to a MacBook Pro and insert it. 
Turn on the MBP and hold down the Alt/Option key until you see a boot menu offering Mac OS X or rEFIt. Choose rEFIt. After that you’ll be give a menu to choose OS X again or Linux. Here, choose Linux. Tada, now comes the Grub boot screen and then on into the Linux of your choice. Congrats and enjoy Some other useful articles that contain detailed instructions: • • •. I have found that a standard Ubuntu/Fedora and even Debian install disc, live CD or USB key will boot fine on a Mac. With a CD you may need to hold down the c key to boot. But I have no problems with USB installs. I would warn that I only have Linux installed on my MacBook now. I installed Ubuntu with a live CD a while ago, now rocking Fedora. Once there is no more OS X, any Linux distribution will boot without much trouble. I'm not sure what happens when you boot a USB key and OS X is still on the machine though. 
How to get ilife for free with new mac os install new apple id. I would recommend looking up key combinations to hold down to boot from USB – c might be enough. Here is an easier alternative and also a more modern answer. I do the following from macOS (assuming the USB was listed as disk4): diskutil list diskutil eraseDisk JHFS+ Temp disk4 diskutil unmountDisk disk4 sudo dd if=/Users/Joe/name.iso of=/dev/disk4 bs=16m && sync With that ready, then do the following to prepare your Mac system.
Gutenprint and Gimp-Print for Mac OS X (10.2 through 10.11 and later). High quality printer drivers for Canon, Epson, Lexmark, and PCL printers. Canon PIXMA MP495; Canon PIXMA MP520; Canon PIXMA MP540; Canon PIXMA MP550. Jun 1, 2016 - Canon PIXMA MP520 Driver Download for OS Windows, OS X and Mac - Canon Pixma MP520 Image All-On-One Inkjet Printer The flexible. Canon PIXMA MP520 – Canon MP520 Driver Windows / Mac OS / Linux Mono file printing proved extremely speedy and also the MP520 is adept for colour DTP, either. Text and also graphics high quality is great, with crisp font style sides as well as solid colour efficiency. Running prices are quite low, which is a real incentive considering the budget purchase rate of the printer. Colour printing worked out moderately economical as well. While the MP520 is exceptionally qualified as a file printer, it does leave a little to be wanted for photo result. The contrast generated by the four-ink system is noticeably lacking and also images have little strike, with just what ought to be deep colours looking instead insipid. Plus factors include dual paper input trays, so you could maintain basic paper in the bottom one and also make use of photo paper or various other specialist paper in the rear tray. 
Checking top quality is well above average and also direct picture printing is particularly uncomplicated. Get the driver software for Canon PIXMA MP520 Driver for Windows on the download link below. 
Compatibility OS Windows 10 / Windows 8.1 / Windows 8 / Windows 7 / Windows Vista / Windows XP / Mac OS X v10.10 /Mac OS X v10.9 / Mac OS X v10.8 / Mac OS X v10.7 / Mac OS X v10.6 / Linux Canon Pixma MP520 Driver for Windows MP520 series MP Driver Ver. 1.01 (Windows 10/8.1/8/7/Vista/XP/2000) ► MP520 series MP Driver Ver. 1.01 (Windows 10/8.1 x64/8 x64/7 x64/Vista64/XP x64) ► MP Navigator EX Ver. 1.07 (Windows XP x64) ► Canon Pixma MP520 Driver for Mac OS MP520 series CUPS Printer Driver Ver. 10.67.2.0 (OS X 10.5/10.6/10.7/10.8) ► MP520 series Scanner Driver Ver. 13.9.2a (OS X 10.5/10.6/10.7/10.8) ► ICA Driver Ver. 3.1.0 (OS X 10.6/10.7/10.8) ► MP Navigator EX Ver. 1.0.7 (OS X 10.2/10.3/10.4/10.5/10.6/10.7/10.8) ► Canon Pixma MP520 Driver for Linux Printer Driver for Linux (rpm) ► ScanGear MP for Linux ► Printer Driver for Linux (debian) ► Canon PIXMA MP520 installer: Steps to install the downloaded software and driver for Canon PIXMA MP520 Driver: • Click Open, and click the downloaded file. The file name ends in exe format. • Accept the default location to save the file. • Click Next, and wait until installer extracts the files and prepare for installation on your PC. • Follow the instructions and install the software until finish. • When finished restart your computer or laptop • Then test the printer by scan test, If it has no problem the printer are ready to use. Print photographs directly from memory cards, previewing and improving pictures to the two.Five inch TFT display screen. Or, print from a compatible electronic digicam or digital camera cellphone, even a Bluetooth device through the optional BU-30 Bluetooth interface. Canon PIXMA MP620 Driver System Requirements & Compatibility Windows 10 (32bit / 64bit), Windows 8.1(32bit / 64bit), Windows 8(32bit / 64bit), Windows 7(32bit / 64bit), Windows Vista(32bit / 64bit), Windows XP SP2 or later, Windows XP x64 Edition, MacOS Sierra v10.12 / Mac OS X v10.11 / Mac OS X v10.10 /Mac OS X v10.9 / Mac OS X v10.8 / Mac OS X v10.7 / Mac OS X v10.6 / Mac OS X v10.5 / Linux. ITube Studio for Mac Overview View Product in Action 1.iSkysoft iTube Studio is powerful software that includes the functions of video downloader and FLV. ITube Studio for Mac enables you to download YouTube to MP3 in 1 click. Follow this guide to download and convert YouTube to MP3 in HD. You will now be able to enjoy your favorite viral video even if you are offline regardless of where you are. This is thanks to iTube Studio which allows you to download all types of videos from Facebook, YouTube, Metacafe, Break and Vimeo. 
You will also be able to download HD videos and this is possible from other video sharing sites in Firefox, Chrome and Safari. It also has the ability to convert the videos you have downloaded or even MP4/FLV videos into a format that can be used on iPods, iPhone 4S, iPad 2, PSP among other devices. The variety of options it allows you is one of the most attractive things about iTube Studio. Features: • Download your favorite videos from video sharing site such as YouTube • Convert video for iPad, iPhone, iPod or iPhone 4 S or any other platform • Manage and play downloaded web video on your Mac's hard drive • Automatically download YouTube video in your specified format--it's hands off. Screenshots: • • •. Product Details Manufacturer: iSkysoft Version: YouTube Converter Price: $29.00 USD The iSkysoft iTube Studio helps you enjoy your favorite viral video offline, anywhere. Offering a multitude of methods to acquire the video, this application downloads videos (HD included) from YouTube, Facebook, Metacafe, Vimeo, Break, and many other video-sharing sites opened in Safari, Chrome or Firefox. After downloading videos it will convert the downloaded videos or exisiting FLV/MP4 videos to use with iPhone, iPod, iPad, PSP and other mobile phones and portable players. If you’re using Windows PC, you can get Our Review of iSkysoft iTube Studio Every second of every day new video clips are posted on YouTube. How would you automatically download and watch them anytime on your computer, mobile phone, iPad, iPhone, iPod, KindFire, PSP, or Zune? The answer – iTube Studio. With this All-In-One YouTube download and conversion program there’s no other software or codecs needed. For fast YouTube downloads and conversions to any mobile player, not just iPad. What’s really impressive is the menu of format conversions available -for all the major mobile devices – not just for iPad. Let’s get first impressions out of the way now – smart detection technology. The app automatically detects the online videos which playing in your web browser and starts to download them. How to get ilife for free with new mac os install new apple id 2017. The detector works well on Safari browser when playing video from Youtube, Facebook, Yahoo Video. 
A great advantage is that iTube Studio will download and convert videos from many video sharing sites. Besides YouTube videos, it downloads videos from over 100 video sharing sites, such as YouTube, Google Videos, VEVO, Facebook, Dailymotion, AOL, Metacafe, MegaVideo, Vimeo, Break. BlipTV, Veoh, VideoBash, LiveLeak, MyVideo, FunnyOrDie, Nico Video, etc. |
АвторНапишите что-нибудь о себе. Не надо ничего особенного, просто общие данные. АрхивыКатегории |


 RSS-канал
